

Build a Custom Weather Notification App with Azure Functions


Introduction
Often, we come across situations where we need hyper-localized weather forecasts for a specific time so we can make an informed decision. Should we take precautionary measures in a particular area where we have employees working? Should we move a stargazing event to a different location that won't be cloudy at the time of the event? Should we pause our company's on-site work because a storm is approaching? The answers to these questions require very specific data.
In this article, we will build an app that sends the weather forecast for the next 108 hours on a per-day basis and stores it in Azure Blob Storage. We will be building this with the help of timer-triggered Azure Functions and the APIs of Tomorrow.io.
A timer-triggered Azure Function works like a serverless background service running on a schedule. In our case, the timer-triggered Azure Function will run every hour, but we can always configure it to meet our business requirements. Tomorrow.io provides an array of weather data through its APIs. We will be using their APIs in our timer-triggered Azure Function to fetch weather data.
To follow along with this article, you will need the following things:
API key for Tomorrow.io's weather API
Visual Studio 2019
Azure Function Runtime V3
Active Azure Subscription
Azure Storage account and blob container
Getting the API Key
Before diving deeper into building the application, let's get the API key for the weather APIs of Tomorrow.io.
To get the API key go to Tomorrow.io and click on sign in. If you already have an account with them. Alternatively, you can register thereby using your Gmail account. If you don't have an account with Tomorrow.io, click on sign up.

Once you log in to the website, go to the development section and get the secret key from there. Store it somewhere for the time being.

Getting the Access Key
Now that we have obtained the secret key, i.e., the API key, let's get the access key of the storage account. For this article, I assume that you have already created a storage account and blob container in your Azure subscription. To get the access keys, go to the storage account and navigate to Security + Networking > Access Keys. Copy key1 or key2 and store it somewhere. We will be using it later in this article.

Building a Timer-Triggered Azure Function
Next, we will develop our timer-triggered Azure Function. Create an Azure Function project in the IDE of your choice and add a timer-triggered function to your project. Once you have done this, add the Azure.Storage.Blobs SDK to interact with the storage account. Open the Package Manager console and enter the below command:
Install-Package Azure.Storage.Blobs -Version 12.10.0
Now, create a class called WeatherModel and add the below code in it:
using System;
using System.Collections.Generic;
using System.Text;

namespace CustomWeatherNotifier
{
    public  class  WeatherModel
    {
       public Data data { get; set; }
    }
    public  class  Data
    {
        public Timeline[] timelines { get; set; }
    }
    public  class  Timeline
    {
        public  string timestep { get; set; }
        public DateTime startTime { get; set; }
        public DateTime endTime { get; set; }
        public Interval[] intervals { get; set; }
    }
    public  class  Interval
    {
        public DateTime startTime { get; set; }
        public Values values { get; set; }
    }
    public  class  Values
    {
        public  float temperature { get; set; }
        public  float precipitationProbability { get; set; }
    }
}
Now, add the following key-value pairs in the appsettings.json file:
"locationCoordinates": "<enter your coordinates>",
"apiKey": "<enter your api key>",
"fields": "temperature,precipitationProbability",
"timeSteps": "1h",
"units": "metric",
"BlobConn": "<enter your storage account access key>",
"containerName": "<enter your container name>"
Next, add a static method named .GenertaUrl to the Function1.cs class. This method will take the locationCoordiantes fields, timeSteps, units, and API key as parameters and generate the URL by adding all the parameters mentioned above in the query string.
public  static  string GenerateUrl(string locationCoordinates,string fields,string timeSteps, string units ,string apiKey)
        {
            var builder = new UriBuilder("https://api.tomorrow.io/v4/timelines?");
            var query = builder.Uri.ParseQueryString();
            query["location"] = locationCoordinates;
            query["fields"] = fields;
            query["timesteps"] = timeSteps;
            query["units"] = units;
            query["apikey"] = apiKey;
            builder.Query = query.ToString();
            string url = builder.ToString();
            return url;
        }
Add a new static HttpClient object to your Function1.cs class. To do so, add the following code to the Function1.cs class.
public static HttpClient client = new HttpClient();
Now, let's update the CRON expression as 0 0 0 * in our timer-triggered function to run it daily at 00:00. Then update the RunAsync method as mentioned below
[FunctionName("Function1")]
public  static  async Task RunAsync([TimerTrigger("0 */5 * * * *")]TimerInfo myTimer, ILogger log)
{
log.LogInformation($"C# Timer trigger function executed at: {DateTime.Now}");

var myUrl = GenerateUrl(Environment.GetEnvironmentVariable("locationCoordinates"), Environment.GetEnvironmentVariable("fields"), Environment.GetEnvironmentVariable("timeSteps"), Environment.GetEnvironmentVariable("units"), Environment.GetEnvironmentVariable("apiKey")

);

var data = await client.GetAsync(myUrl);
log.LogInformation(data.StatusCode.ToString());
var res = await data.Content.ReadAsStringAsync();

// convert string to stream
byte[] byteArray = Encoding.UTF8.GetBytes(res);

//byte[] byteArray = Encoding.ASCII.GetBytes(contents);
MemoryStream stream = new MemoryStream(byteArray);

//create a blob with the name of the date
BlobClient blobClient = new BlobClient(Environment.GetEnvironmentVariable("BlobConn"), Environment.GetEnvironmentVariable("containerName"), DateTime.Now.ToShortDateString());

//write the weather data to the blob
blobClient.Upload(stream);
}
In the above-mentioned code, we are building the URL using the GenerateUrl method. Then, we fetched the data from the weather API of Tomorrow.io by passing the URL with the GetAsync method to the HTTP Client object.
Post that, we convert the response content to string using the ReadAsStringAsync method. Then, we convert the string into a byte array and use it to convert it to a stream object.
Now, we will create a blob client object by passing the Access key of the Storage account, container name, and file name, i.e., the current date in dd-mm-yyyy format. Then, we will pass the stream object to the upload method of the blob client object.
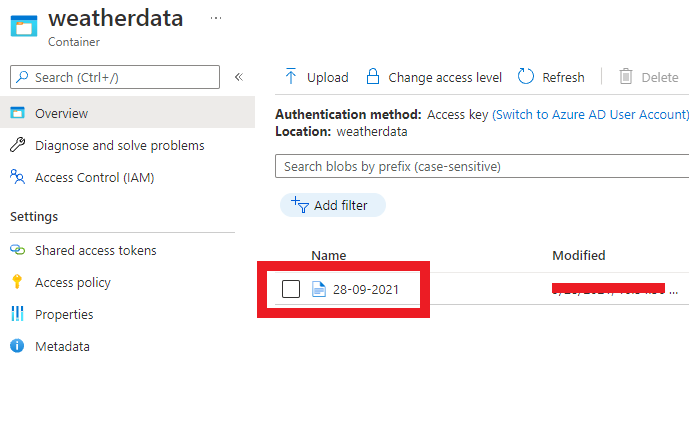
As you can see from the above image, a file was created in the blob container of our storage account for the date on which the function was triggered. It will create a new file every day and add the weather data for the next 108 hours from that day in that file.
Currently, it is only adding the temperature value and the precipitation probability in files. However, if we want to add more meteorological data, we can add the name of the fields in the "fields" key in the appsettings.json file.
Let's say we wanted to fetch wind speed along with temperature and precipitation probability. In such a case, we will modify the value of the "fields" key as "temperature,precipitationProbability,windSpeed". This will now fetch the wind speed as well. We can fetch a lot more meteorological data, like humidity, wind gusts, and so on.
Conclusion
In this article, we explored integrating the weather API of Tomorrow.io with a timer-triggered Azure Function to fetch the daily temperature and precipitation probability for the next 108 hours from the current date and time.
We have also learned ways to create a blob in the blob container of the storage account with the name in the dd-mm-yyyy format, representing the date on which the function ran and added the weather data to the blob. The data stored in these files can be used for various purposes. One of the notable use cases can be to perform time series analysis to gather insights about the changing weather with reference to historical data.